3.3V Arduino
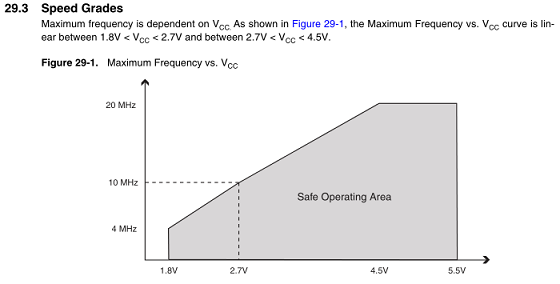
In some cases the Atmega328 can be run at 16MHz and 3.3V, but this is usually unreliable. 16MHz is about a 20% overclock. The bigger problem is the error rate for the serial port which is almost one bit error per byte at higher bit rates.According to the Atmega328 data sheet, the maximum frequency is dependent on VCC. As shown in Figure 29-1, the Maximum Frequency vs. VCC curve is linear between 1.8V < VCC < 2.7V and between 2.7V < VCC < 4.5V. Using the values from the graph of 2.7V @ 10MHz, 4.5V @ 20MHz, and interpolating for 3.3V, gives a maximum frequency of 13.333MHz.
According to WormFood's AVR Baud Rate Calculator many clock rates have very high serial error rates. The table below shows the error rates for 115200 baud for a range of processor frequencies. Notice that for 8MHz the error rate is 7.8% which in practice is an error in every 2 or 3 characters. For 16MHz the error rate is 3.7%, which is better than the rate for 8MHz, but is still high. Also note that the frequencies 9.216MHz/11.0592MHz/14.7456MHz all have zero percent error rates.
| Crystal Frequency (MHz) | 8 | 9.216 | 11.0592 | 14.7456 | 16 | 16.8 | 18.432 | 20 | % error rate | 7.8 | 0.0 | 0.0 | 0.0 | 3.7 | 1.3 | 0.0 | 1.4 |
Based on WormFood's tables, the highest frequency that is both accurate for serial baud rates and under the 13.333MHz speed limit is 11.0592MHz.
Building 9.216MHz/11.0592MHz/14.7456MHz bootloaders
In order to use alternate Atmega328 speeds, a new bootloader must be created to use the new speed.The first clues on how to use frequencies other than 8MHz/16MHz with the Arduino came from posts in the Arduino forum:
ATmegaBOOT_168.c bootloader does not compile with newer AVR tool
SOLVED! ATMega328P at 14.7456 MHz
Extra credit needs to go to user "avenue33" for his help in clarifying the changes needed.
The Optiboot bootloader was chosen because it is the standard bootloader used in the current UNO boards as well as it is much smaller than the older boot loader and leaves more space for program code.
A new Arduino board type needs to be created for each of the new speeds. Add the new Arduino speeds to the list of boards using the original 16MHz UNO board settings as a template.
The following lines need to be added to the file: "Arduino 1.0.5\hardware\arduino\boards.txt"
uno9216.name=Arduino Uno 9.216MHz
uno9216.upload.protocol=arduino
uno9216.upload.maximum_size=32256
uno9216.upload.speed=115200
uno9216.bootloader.low_fuses=0xff
uno9216.bootloader.high_fuses=0xde
uno9216.bootloader.extended_fuses=0x05
uno9216.bootloader.path=optiboot
uno9216.bootloader.file=optiboot_atmega328_9_216MHz.hex
uno9216.bootloader.unlock_bits=0x3F
uno9216.bootloader.lock_bits=0x0F
uno9216.build.mcu=atmega328p
uno9216.build.f_cpu=9216000L
uno9216.build.core=arduino
uno9216.build.variant=standard
##############################################################
uno110592.name=Arduino Uno 11.0592MHz
uno110592.upload.protocol=arduino
uno110592.upload.maximum_size=32256
uno110592.upload.speed=115200
uno110592.bootloader.low_fuses=0xff
uno110592.bootloader.high_fuses=0xde
uno110592.bootloader.extended_fuses=0x05
uno110592.bootloader.path=optiboot
uno110592.bootloader.file=optiboot_atmega328_11_0592MHz.hex
uno110592.bootloader.unlock_bits=0x3F
uno110592.bootloader.lock_bits=0x0F
uno110592.build.mcu=atmega328p
uno110592.build.f_cpu=11059200L
uno110592.build.core=arduino
uno110592.build.variant=standard
##############################################################
uno147456.name=Arduino Uno 14.7456MHz
uno147456.upload.protocol=arduino
uno147456.upload.maximum_size=32256
uno147456.upload.speed=115200
uno147456.bootloader.low_fuses=0xff
uno147456.bootloader.high_fuses=0xde
uno147456.bootloader.extended_fuses=0x05
uno147456.bootloader.path=optiboot
uno147456.bootloader.file=optiboot_atmega328_14_7456MHz.hex
uno147456.bootloader.unlock_bits=0x3F
uno147456.bootloader.lock_bits=0x0F
uno147456.build.mcu=atmega328p
uno147456.build.f_cpu=14745600L
uno147456.build.core=arduino
uno147456.build.variant=standard
##############################################################
Building Optiboot bootloaders
Before building custom versions of the Optiboot bootloader, a patch to the source code is needed along with creating an entry for each new frequency in the Makefile.Edit the file to look like this:
"\Applications\Arduino.app\Contents\Resources\Java\hardware\arduino\bootloaders\atmega\ATmegaBOOT_168.c" around line 583
#if defined(__AVR_ATmega1280__) || defined(__AVR_ATmega1281__)
while(bit_is_set(EECR,EEPE)); //Wait for previous EEPROM writes to complete
#else
// while(bit_is_set(EECR,EEWE)); //Wait for previous EEPROM writes to complete
while(!eeprom_is_ready());
// http://arduino.cc/forum/index.php?action=printpage;topic=58154.0
// Title: ATmegaBOOT_168.c bootloader does not compile with newer AVR tools
// Post by: bperrybap on April 11, 2011, 02:26:42 AM
#endif
Next, add the following lines to add new board types in the makefile:
\Arduino 1.0.5\hardware\arduino\bootloaders\optiboot\Makefile
atmega328_14756: TARGET = atmega328_14_7456MHz
atmega328_14756: MCU_TARGET = atmega328p
atmega328_14756: AVR_FREQ = 14745600L
atmega328_14756: $(PROGRAM)_atmega328_14_7456MHz.hex
atmega328_14756: $(PROGRAM)_atmega328_14_7456MHz.lst
atmega328_14756_isp: atmega328
atmega328_14756_isp: TARGET = atmega328_14_7456MHz
atmega328_14756_isp: MCU_TARGET = atmega328p
atmega328_14756_isp: HFUSE = DE
atmega328_14756_isp: LFUSE = FF
atmega328_14756_isp: EFUSE = 05
atmega328_14756_isp: isp
atmega328_14756: CFLAGS += '-DMAX_TIME_COUNT=F_CPU>>4' '-DNUM_LED_FLASHES=1' -DBAUD_RATE=115200
atmega328_14756: LDSECTIONS = -Wl,--section-start=.text=0x7e00 -Wl,--section-start=.version=0x7ffe
atmega328_9216: TARGET = atmega328_9_216MHz
atmega328_9216: MCU_TARGET = atmega328p
atmega328_9216: AVR_FREQ = 9216000L
atmega328_9216: $(PROGRAM)_atmega328_9_216MHz.hex
atmega328_9216: $(PROGRAM)_atmega328_9_216MHz.lst
atmega328_9216_isp: atmega328
atmega328_9216_isp: TARGET = atmega328_9_216MHz
atmega328_9216_isp: MCU_TARGET = atmega328p
atmega328_9216_isp: HFUSE = DE
atmega328_9216_isp: LFUSE = FF
atmega328_9216_isp: EFUSE = 05
atmega328_9216_isp: isp
atmega328_9216: CFLAGS += '-DMAX_TIME_COUNT=F_CPU>>4' '-DNUM_LED_FLASHES=1' -DBAUD_RATE=115200
atmega328_9216: LDSECTIONS = -Wl,--section-start=.text=0x7e00 -Wl,--section-start=.version=0x7ffe
atmega328_110592: TARGET = atmega328_11_0592MHz
atmega328_110592: MCU_TARGET = atmega328p
atmega328_110592: AVR_FREQ = 11059200L
atmega328_110592: $(PROGRAM)_atmega328_11_0592MHz.hex
atmega328_110592: $(PROGRAM)_atmega328_11_0592MHz.lst
atmega328_110592_isp: atmega328
atmega328_110592_isp: TARGET = atmega328_11_0592MHz
atmega328_110592_isp: MCU_TARGET = atmega328p
atmega328_110592_isp: HFUSE = DE
atmega328_110592_isp: LFUSE = FF
atmega328_110592_isp: EFUSE = 05
atmega328_110592_isp: isp
atmega328_110592: CFLAGS += '-DMAX_TIME_COUNT=F_CPU>>4' '-DNUM_LED_FLASHES=1' -DBAUD_RATE=115200
atmega328_110592: LDSECTIONS = -Wl,--section-start=.text=0x7e00 -Wl,--section-start=.version=0x7ffe
while in the folder: \Arduino 1.0.5\hardware\arduino\bootloaders\optiboot\
Run the omake.bat file from the command line
omake atmega328_9216
omake atmega328_110592
omake atmega328_14756
omake atmega328
omake atmega328_110592
omake atmega328_14756
omake atmega328
which produces these hex files:
optiboot_atmega328_9_216MHz.hex
optiboot_atmega328_11_0592MHz.hex
optiboot_atmega328_14_7456MHz.hex
optiboot_atmega328.hex
optiboot_atmega328_11_0592MHz.hex
optiboot_atmega328_14_7456MHz.hex
optiboot_atmega328.hex
A set of precompiled alternate frequency bootloaders can be found on the downloads page.
Using the new alternate Atmega328 speeds with the Arduino software
Once the boards.txt file has been uploaded and the Arduino application has been restarted, the 3 new boards will be available under Tools->Boards.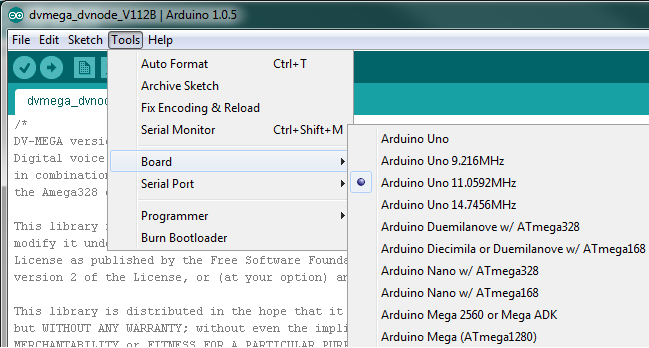
When using some versions of the Arduino envrionment, there are some changes needed to the sketches to allow for the new frequencies. The changes do not appear to be required when running version 1.05.
Fixing the time based functions
The function "delay" may not properly handle the new frequencies. Instead it is safer to use the "delay_ms" and "delay_us" functions. They are not defined by default in the Arduino environment, so they must specified with the include file and then use the _delay_ms() call instead of the delay() call.
#include <util/delay.h>
Alternately, the functions can be specified with the following two lines:
static inline void _delay_us(double __us) __attribute__((always_inline));
static inline void _delay_ms(double __ms) __attribute__((always_inline));
static inline void _delay_ms(double __ms) __attribute__((always_inline));
The millis, micros, delay, delayMicroseconds in wiring.c may have problems with the new F_CPU value.
Here's an example of the Blink code with the delay_ms function used.
// these defines and include not needed
#define F_CPU 14745600L
#include <util/delay.h>
void setup() {
pinMode(13, OUTPUT);
}
void loop() {
digitalWrite(led, HIGH); // turn the LED on (HIGH is the voltage level)
// delay(1000); // wait for a second
_delay_ms(1000);
digitalWrite(led, LOW); // turn the LED off by making the voltage LOW
// delay(1000); // wait for a second
_delay_ms(1000);
}
Fixing the baud rates
The AVR registers controlling the serial port are configured based on the crystal frequency (F_CPU). When the definition for F_CPU is not passed to the serial port initialization code via the boards.txt file, it needs to be included in the main code.
#define F_CPU 14745600L
#define BAUD 115200
// the baud rate calcuation is based on F_CPU and may already be handled in HardwareSerial.cpp
#include <util/setbaud.h>
All text and images on ki6zum.com are copyright (c) 2010-2014 and may not be reproduced in any form without written permission.
#define BAUD 115200
// the baud rate calcuation is based on F_CPU and may already be handled in HardwareSerial.cpp
#include <util/setbaud.h>